How to Make Glitter Text in Photoshop
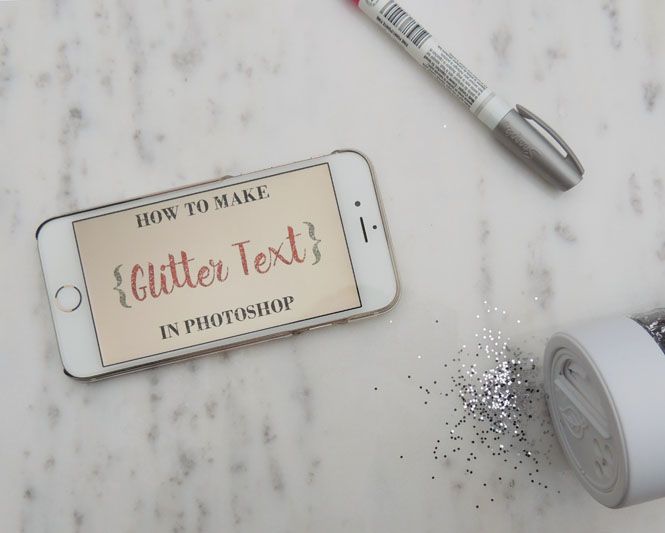 When I made my holiday gift guides this past holiday, I created a ton of fun glitter texts and I had a ton of people asking where I found the fonts and how I got glitter fonts. I was so excited, because creating glitter text is by far one of my favorite things to do! (you can check out the post I'm talking about here!) For all of my photo editing, I use Photoshop CS5 and CS6 and the same goes for creating my glitter text. It's way easier than you would probably expect too.
Obviously for this tutorial, you need to have Photoshop and you should be somewhat familiar with it. This is a fairly easy process, but knowing the basic tools will be super helpful with this. I love glitter everything and when real glitter just isn't possible, glitter in Photoshop is clearly the next best thing! ; )
The first step in creating glitter text is finding a color and texture that you like and saving it to your computer. To make it easier for you guys, I put together some of the prettiest colored glitter overlays that you can download for FREE at the bottom of this post, so make sure to check that out!
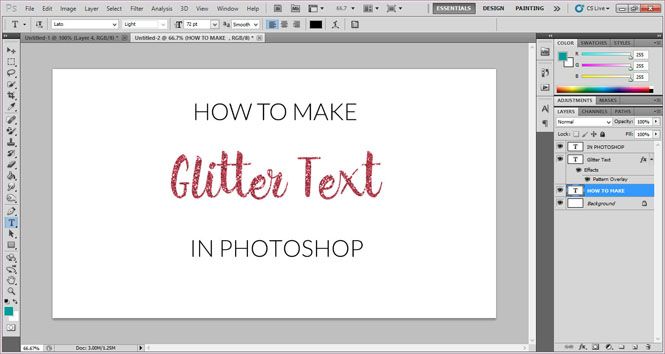
First, you'll want to download the glitter texture(s). Open a new document and make a text box with whatever you want to write.
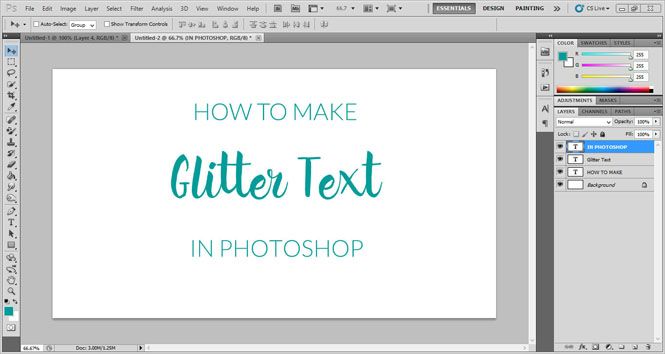 Next, open up your glitter pattern(s) file.

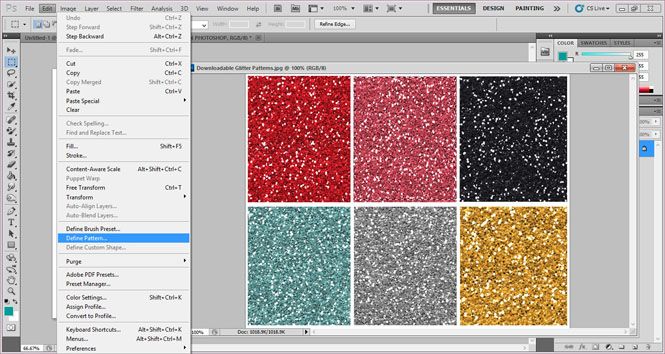
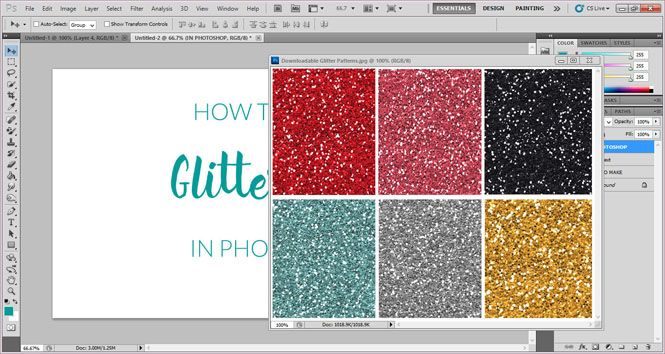 Use the rectangular marquee tool (the highlighted tool in this picture, it's the second from the top in most Photoshop programs), select the color glitter that you want to use. I chose the pink for this step; it'll show a revolving line around your selected area.
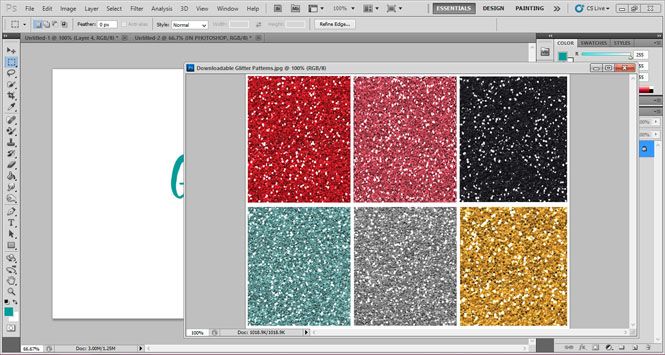 Once you have the pattern you want to use selected, click Edit - Define Pattern
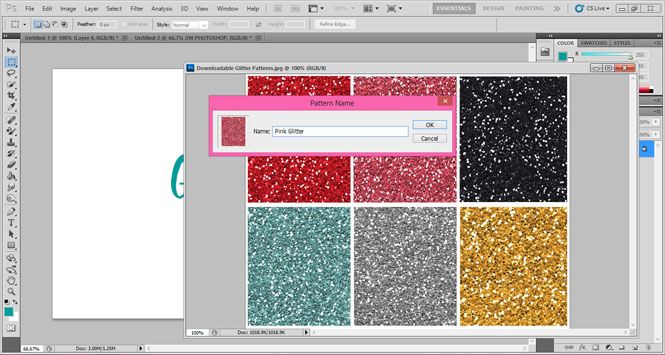
 Once you click to define the pattern, this pop up box will appear and you can name your pattern. You can name these any way you want to; I usually name my patterns descriptively.
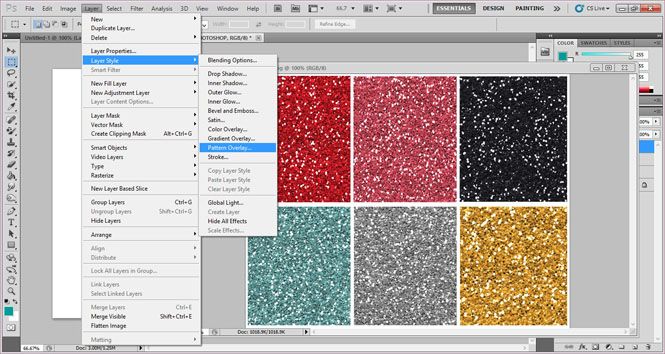
 Click on Layer - Layer Style - Pattern Overlay and another pop up box will appear where you can choose a preset pattern for your chosen text. This is the step you would start at if you were trying to add a pattern to text that you already had saved/defined as a pattern.
 All of your preset patterns will appear in the popup box. I like to define my patterns whenever I find a new one that I know I'll want to use so that it's there and ready to go for me! You know, in all that free time I don't have ; ) Select which ever pattern you'd like. Once you select it, you can see (behind the popup box) that the change was made on the selected text. Speaking of which, when doing this, it's important to make sure that you are working on the layer that you want changed. That layer must be selected for it to change!
Under the pattern selection section, there's a meter where you can change the scale. This allows you to zoom in or out on the pattern you chose; for glitter patterns, zoomed out more tends to work best so that you can tell what it is and so that more glitter grains (if that's the right word?) show. 100% tends to be best - sometimes somewhere around 85% works too if the glitter "grains" are bigger.
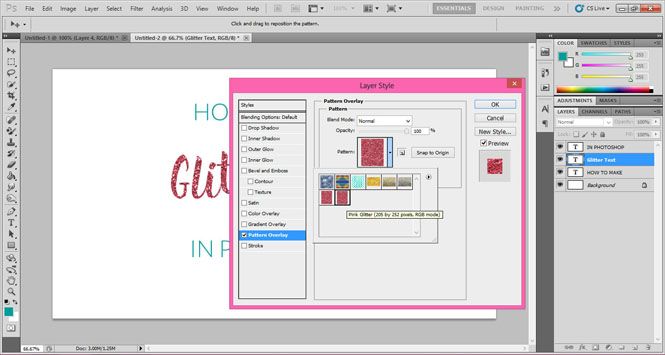 Once you've made your selections, press ok and your changes will be saved! BOOM! You now have beautiful, glittery text!
 Once you do one layer, you can just as easily do more! I usually opt to do one or two lines of text in glitter and the rest in a corresponding color, but depending on the project, a ton of glitter in a ton of colors can be really fun! For the sake of this tutorial, I did the other two lines of text in a different colored glitter:
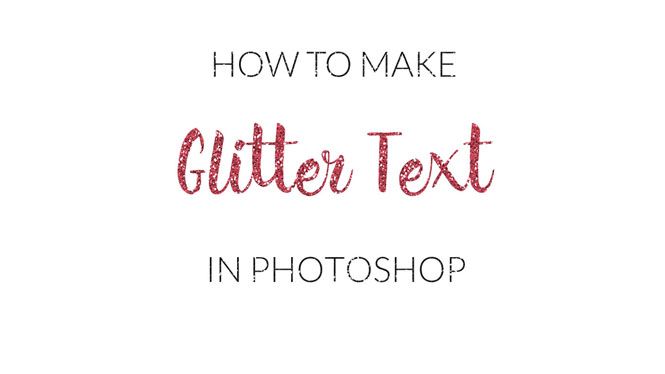 But it's kind of hard to see the glitter in such a thin font... Thicker fonts and ones that are more block-ish (that wasn't a word before I made it one) definitely work best here. You can change your font after applying the glitter/pattern overlays though, like this:

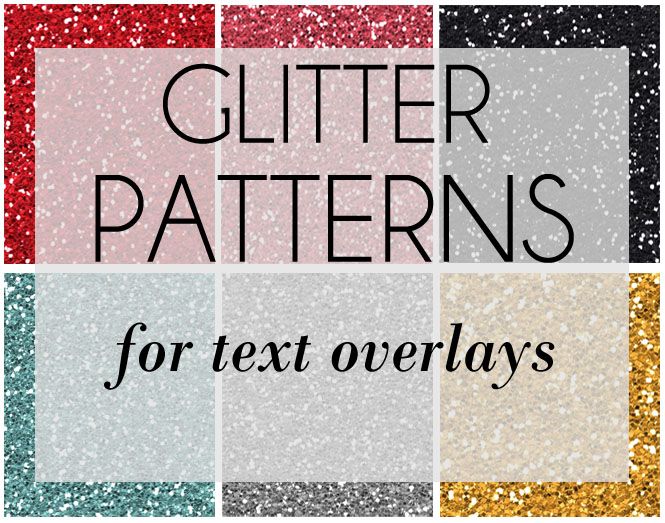 Click HERE to download 6 free glitter patterns!
All of the downloadable textures are totally free for personal use! I do have original, large and high quality images of each glitter texture and would be happy to sell them to anyone who wants them for any type of commercial use! Please email me (adriana_nudo@yahoo.com) and I will gladly send along the originals. These took a while to make, but have been really helpful for me so if you are a designer or just want them for your blog, business, etc. I'm happy to share at a reasonable (promise!) price.
Aren't these so cool?! I absolutely love the way glitter text looks and it's so simple to do too. There are a ton of different ways to use glitter text too; I hope this tutorial helps anyone with Photoshop! I'm sure there are other ways to make glitter text if you don't have Photoshop, but this is what I use and how I've found the best way to make it!
XOXO


I didn't even realize photo shop was still around with all the other editing software programs available now. How great that they are still around :)
ReplyDeleteYes, glitter everything is awesome! I'm going to try this next time I use photoshop. I love the downloads, too!
ReplyDeleteI love the way glitter makes word shine. We have Photoshop but I've never actually tried doing this now I know what I need to do later.
ReplyDeleteThis is gorgeous. This tutorial will come in handy for so many bloggers and graphic designers. Glitter makes everything better.
ReplyDeleteThat is freaking awesome! I am going to have to try that! I am not a fine of real glitter but love virtual glitter!!
ReplyDeleteI love glitters! I'm not at good at photo shop but i would love to try this glitter
ReplyDeleteThis is so fun. I majored in graphic design but rarely get to play with it anymore and I only have a light version of PS now.
ReplyDeleteThis looks great and so simple! I love Photoshop though I'm not very good at using it.
ReplyDeletePinning this! I haven't played with photoshop in forever but I have always wanted to know how to make glitter text. So much fun!
ReplyDeleteThank you so much for this! I've always wondered how to do it! Hopefully I'll be able to recreate your lovely artwork :)
ReplyDeleteI love it! The first time I discovered using patterns in photoshop... I kinda went pattern crazy and did most of my text and fonts with patterns. Lol.
ReplyDeleteHow exciting! I have slowly been learning the ins and outs of photoshop and you made this look so easy! I cannot wait to try this!
ReplyDeleteThis was so helpful! I've been recently playing around with photoshop and trying to pick up on things. Thanks for the free glitter patterns.
ReplyDeleteThanks for sharing, will be trying this one this afternoon :)
ReplyDeleteSammy @ www.bargainbaglady {xx}
These is pretty awesome :) What a beautiful and Nice way to design the text. Haven't heard this before. I'm surely going to try this.
ReplyDeleteI used the same technique for a lot of pattern overlays. Especially metal and marble.
ReplyDeleteThat looks awesome! I am going to be trying this soon! Thank you for posting this!!!
ReplyDeleteThis is an awesome tutorial. I've always wondered how people made graphics look like that. Thanks for posting.
ReplyDeleteI'd like to learn photoshop. I've seen some pretty cool things from it.
ReplyDeleteI use clipping masks to create gold foil text all the time! I should try glitter though!
ReplyDeleteI am so not photoshop savvy, I use it to edit my photography photos but never to add words for my blog. I may need to try this out one day when I have some free time.
ReplyDeleteThis is a helpful tutorial. I only know some basics of Photoshop and I would really love to learn more.
ReplyDeleteI love this so much!! I'm obsessed with gold glitter so I'm definitely bookmarking this for future reference.
ReplyDeleteThis really helps make even better presentations. The glittery text can really give your work a lot more spunk.
ReplyDeleteThis is absolutely awesome! Looks like i wanna try this glitters but I'm not good at Photo shop
ReplyDeletenice tutorial wish i a more patient to do this haha i dont even have photoshop. i dont have time at all to do it editing all the photos + videos. love the tutorial
ReplyDeleteYou can find a lot of lessons to create in Photoshop various beautiful effects in the Web. Particularly fashionable in recent times has been added to text effects such as shadows, reflections, lights, and other indentation. http://hdreditingsoftware.com/cs3/ here is an article about photoshop plugins for mac users
ReplyDeleteThis is one of my favorite things to do!
ReplyDeleteMikayla | A Seersucker State of Mind.
Oh how I miss having photoshop! I had it on my old computer and just never got it again on my new one... This would be so fun! - Jeanine
ReplyDeleteThis is awesome! I am not very good at Photoshop, but I think I could totally do this.
ReplyDeletePinning this. It's a great, but simple tutorial and who who doesn't like a little glitter text? :)
ReplyDeleteI am still learning Photoshop, but I would love to try making fun glitter text for some of my projects. It doesn't sound too hard and I think it is something that I could handle. Thanks!!
ReplyDeletethis was super cool! I don't use photoshop but this was a excellent tutorial
ReplyDeleteI wish I was better at doing graphics. I need to learn and stop spending money for someone else.
ReplyDeleteThis glitter text is awesome from photoshop. I will have to download photoshop first. Thanks for sharing because I love anything glitter.
ReplyDeleteWhat a fun tutorial! Love the glitter effect on text!
ReplyDeleteThank you so much for this tutorial! I have been wondering how it's possible to get glitter text. Will try it for sure!
ReplyDeleteThis is so cool! I need to get photoshop. How much do you pay for it?
ReplyDeleteLooks like I need to get me the photoshop software as I would like to incorporate glitter text in my posts. Thanks for the tutorial.
ReplyDeleteAnosa
Great tutorial!!! I love doing glittery text in Photoshop!!
ReplyDeleteThis girl loves her glitter! Thanks for the step by step instructions. Can't wait to play!
ReplyDeleteoh I love Glitter and this post will give me hours of Photoshop fun! Thanks for a great step by step
ReplyDeleteI love the Glitter text. I so want to learn how to use Photoshop, but every time I try, I just can't get the hang of it. This looks so easy!
ReplyDeleteThis is beautiful. I never would have known about this feature if not for this tutorial. Thanks for sharing this.
ReplyDeleteThis is so fun!! I'm not so good with Photoshop so it's great information for me! Thanks for sharing!!
ReplyDeleteBookmarked! This is super helpful.
ReplyDeleteI am going to try this out for sure. That looks so pretty! Amber N
ReplyDeleteMy husband is so good & skilled in Photoshop related works & he used to teach me few tips & tricks when we are free enough. This is such a wonderful tutorial that I would love to try out & see how I get it done.
ReplyDeleteI was so lazy to learn photoshop, this is really cool, I need to get photoshop again, gave it to my daughter with my laptop.
ReplyDeleteOh gosh. Have to bookmark this page - I have been wanting to try this out!
ReplyDeleteNice tutorial you have here! Thank you!
ReplyDeleteGlitter! I love this!!! I am sending to my graphic designer for my site so we can make some new images. Thanks for sharing
ReplyDeleteInteresting solution, if you have IPhone or MAC at home I can advise you to try Macphun macphun.com photo editor for mac. This software help you to create beautiful stock photos fast from your IPhone photos. Try to and I'm sure you'll like it.
ReplyDeleteI’m very skilled at neck joint service in Photoshop. But now I like to try making glitter text in Photoshop for some of my projects. I think your post is very insightful for this respect and will help me a lot. Thanks for sharing this tutorial.
ReplyDeleteMany many thanks for sharing with us how to make glitter text in Photoshop. Share with us a great post about Neck Joint service. I am waiting for this. Thanks again.
ReplyDeleteI was surfing the Internet for information and came across your blog. I am impressed by the information you have on this blog. It shows how well you understand this subject. click here
ReplyDeleteThese background removal service services can do marvels to an image by different ways. Coloring amendment can enhance the hues and its complexity. You can improve as well as balance the blurred colors of the image devoid of so many struggles.
ReplyDeleteSuperb way of explaining, and great blog to get wonderful information.
ReplyDeleteUI design companies
With a solid foundation, you have a better chance of accomplishing your mission in life. In all honesty, what you see is sometimes not always what you get. The underlying of hard work and pursuing our true purpose and meaning can be summed up with what we do and how we respond to what we have learned in this life's journey. Glitter for crafts
ReplyDeleteParticular points are generally the idea of the Adobe photograph shop instructional exercise.Professional graphic design
ReplyDeleteOrganizational culture was found to be deficient in companies were workers tend to avoid confrontation and therefore avoid product tests altogether (2007). adobe photoshop crack gratuit
ReplyDeleteEver wondered how to make your own glitter letters but don't want to go through the hassle of photoshop? If you want to create amazing typography effects in Photoshop first you must know the basic rules and techniques.
ReplyDeleteOn a stag weekend the participants are looking for lighter entertainment but might really appreciate it if the party elements are infused with some local traditions. ingatlan budapest
ReplyDelete